HTTPS是什么?
HTTPS(全称:HyperText Transfer Protocol over Secure Socket Layer),其实 HTTPS 并不是一个新鲜协议,Google 很早就开始启用了,初衷是为了保证数据安全。 近两年,Google、Baidu、Facebook 等这样的互联网巨头,不谋而合地开始大力推行 HTTPS, 国内外的大型互联网公司很多也都已经启用了全站 HTTPS,这也是未来互联网发展的趋势。
使用HTTPS之前有什么问题?
- 窃听:传输内容监听。
- 篡改:对传输数据修改。
- 冒充:黑客冒充与你通信的人。
HTTPS诞生之路
诞生速览
对称加密--->(RSA)非对称加密--->对称加密+非对称加密(结合版)--->CA证书
演进
任何技术并非一开始都是十全十美的,HTTPS也不例外。
想象如下场景: 张三与李四在网络上通信聊天,此时通信是没有任何加密的,黑客可以任意监听我们的消息,简直就是在网络上裸奔,此时最常见的办法就是对称加密了,张三李四需要有同样的秘钥进行加密解密。
但是此时问题又来了,秘钥在张三手里可是要怎么传输黑李四?纵使对称加密再安全,也得有个先给对方秘钥的过程,如果此时是被监听的,那么传输的秘钥同样会被截取,同样白费功夫,即使让张三当面传输给李四,可是张三的好友还有王五、赵六孙钱等等等,不可能挨个发给他们。
不过还有一个办法,使用非对称加密,私钥在张三手里,公钥是公开的,用私钥加密的数据只有公钥能解密,用公钥加密的数据只有私钥能解密,这样安全性就提高了不少。
但是问题依然存在,公钥是公开的,那么黑客也会有公钥,虽然黑客看不到李四的数据(李四使用公钥加密的数据只有私钥能解密)但是依然可以看到张三的数据,并且非对称加密算法性能比对称加密算法差太多,如果全靠非对称加密通信那么体验会差很多。
性能不好并且同样有泄露算法的风险该怎么办呢?可以试试非对称加密+对称加密算法(结合),首先,张三使用非对称加密算法加密对称加密算法发送给李四,李四使用公钥解密获得对称加密算法,后续的通信使用加密算法通信。
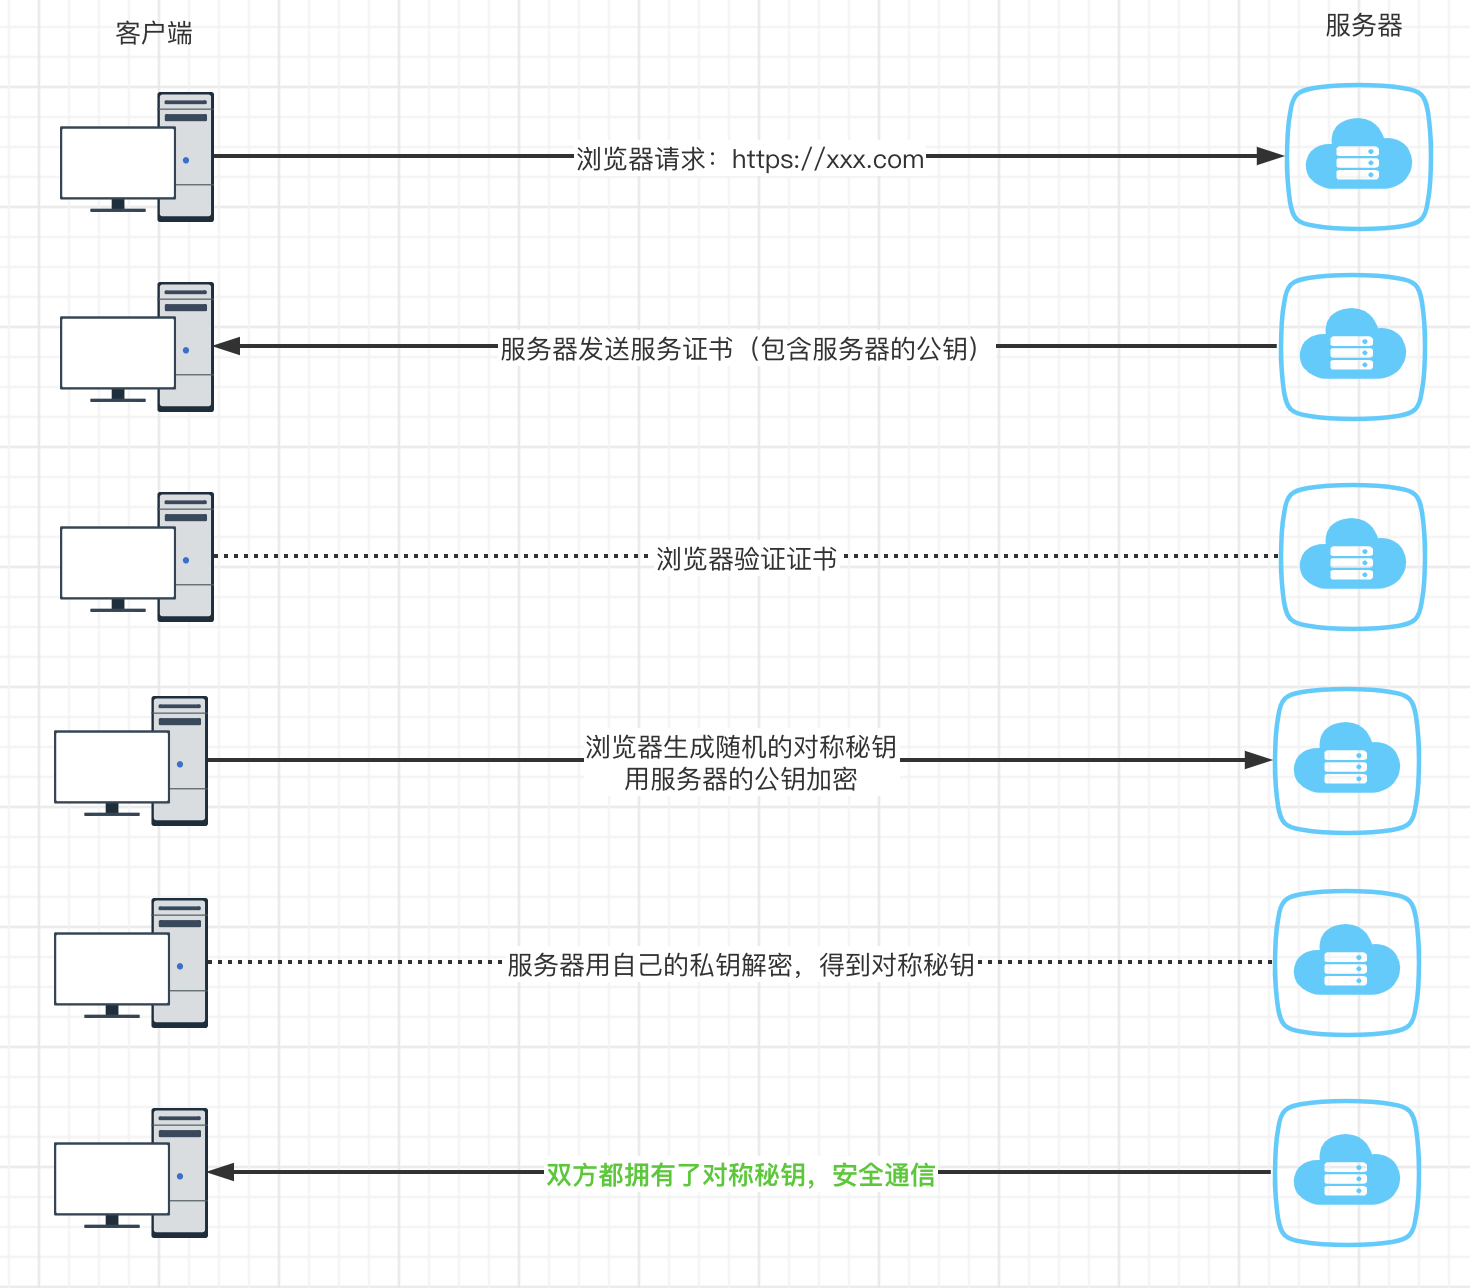
但是此种方式虽然解决了性能问题,但是黑客监听问题依然没有解决,公钥、对称加密的分发都没有得到解决,这个时候CA(Certificate Authority)证书就派上用场了,HTTPS如图所示:

其实用咱大白话讲https就是结合对称加密和非对称加密再搭配CA机构(一个可信的数字证书颁发实体)对网站进行安全加密的技术。
为网站配置HTTPS
一、获取证书
在 freessl 网站生成证书,需要用到keymanager软件。
二、解析证书获取.crt和.key
三、配置Nginx
- 1
- 2
- 3
- 4
- 5
- 6
- 7
- 8
- 9
- 10
- 11
- 12
- 13
- 14
- 15
- 16
- 17
- 18
- 19
- 20
- 21
- 22
- 23
- 24
- 25
- 26
- 27
- 28
- 29
- 30
- 31
- 32
- 33
- 34
- 35
- 36
- 37
- 38
- 39
- 40
- 41
- 42
- 43
- 44
- 45
- 46
- 47
- 48
- 49
- 50
- 51
- 52
- 53
- 54
- 55
- 56
- 57
- 58
- 59
- 60
- 61
- 62
- 63
- 64
- 65
- 66
- 67
- 68
- 69
- 70
- 71
- 72
- 73
- 74
- 75
- 76
- 77
- 78
- 79
- 80
- 81
- 82
- 83
- 84
- 85
- 86
- 87
- 88
- 89
- 90
- 91
- 92
- 93
- 94
- 95
- 96
- 97
- 98
- 99
- 100
- 101
- 102
- 103
- 104
- 105
- 106
- 107
- 108
- 109
- 110
- 111
- 112
- 113
- 114
- 115
- 116
- 117
- 118
- 119
- 120
- 121
# formation on configuration, see:
#   * Official English Documentation: http://nginx.org/en/docs/
#   * Official Russian Documentation: http://nginx.org/ru/docs/

# user nginx;
worker_processes auto;
error_log /var/log/nginx/error.log;
pid /run/nginx.pid;


# Load dynamic modules. See /usr/share/nginx/README.dynamic.
# include /usr/share/nginx/modules/*.conf;

events {
  worker_connections 1024;
}

http {
  log_format  main  '$remote_addr - $remote_user [$time_local] "$request" '
  '$status $body_bytes_sent "$http_referer" '
  '"$http_user_agent" "$http_x_forwarded_for"';

  access_log  /var/log/nginx/access.log  main;

  sendfile            on;
  tcp_nopush          on;
  tcp_nodelay         on;
  keepalive_timeout   65;
  types_hash_max_size 2048;

  #include             /etc/nginx/mime.types;
  # default_type        application/octet-stream;

  # Load modular configuration files from the /etc/nginx/conf.d directory.
  # See http://nginx.org/en/docs/ngx_core_module.html#include
  # for more information.
  #include /etc/nginx/conf.d/*.conf;

 # server{
  #      listen 80;
   #     server_name codeway.me www.codeway.me;
    #    return 302 https://codeway.me$request_uri;
#}}

# 配置支持socket的二级域名,因为用了https://www.nodecache.com不支持
 server {
    listen       443 ssl;
    server_name socket.codeway.me;
    root         /usr/share/nginx/html;
    ssl_certificate /usr/share/nginx/html/socket.codeway.me_chain.crt;
    ssl_certificate_key /usr/share/nginx/html/socket.codeway.me_key.key;
    ssl_session_cache   shared:SSL:10m;
    ssl_session_timeout 10m;
    location ~* \.io {
      proxy_set_header X-Real-IP $remote_addr;
      proxy_set_header X-Forwarded-For $proxy_add_x_forwarded_for;
      proxy_set_header Host $http_host;
      proxy_set_header X-NginX-Proxy false;
      proxy_pass http://202.182.114.223:3000;
      proxy_redirect off;
      proxy_http_version 1.1;
      proxy_set_header Upgrade $http_upgrade;
      proxy_set_header Connection "upgrade";
    }
}
  server {
    #listen 80;
    listen       443 ssl;
    server_name codeway.me;
    root         /usr/share/nginx/html;
    ssl_certificate /usr/share/nginx/html/codeway.me_chain.crt;
    ssl_certificate_key /usr/share/nginx/html/codeway.me_key.key;
    ssl_session_cache   shared:SSL:10m;
    ssl_session_timeout 10m;
    # Load configuration files for the default server block.
    #  include /etc/nginx/default.d/*.conf;
 location ~* \.io {
      proxy_set_header X-Real-IP $remote_addr;
      proxy_set_header X-Forwarded-For $proxy_add_x_forwarded_for;
      proxy_set_header Host $http_host;
      proxy_set_header X-NginX-Proxy false;

      proxy_pass http://202.182.114.223:3000;
      proxy_redirect off;

      proxy_http_version 1.1;
      proxy_set_header Upgrade $http_upgrade;
      proxy_set_header Connection "upgrade";
    }
 location ^~ /api/ {
     proxy_pass http://121.36.158.84:8080$request_uri;
}
    location / {
      proxy_http_version 1.1;
      proxy_set_header Upgrade $http_upgrade;
      proxy_set_header Connection "upgrade";
      proxy_connect_timeout 6000;
      proxy_read_timeout 6000;
      proxy_set_header Host $host;
      proxy_set_header X-Real-IP $remote_addr;
      proxy_set_header X-Forwarded-Host $host;
      proxy_set_header X-Forwarded-Server $host;
      proxy_set_header X-Forwarded-For $proxy_add_x_forwarded_for;
      proxy_pass http://202.182.114.223:3000/;
     # proxy_pass http://202.182.114.223:3000/;
 #   index index.html;
}

    error_page 404 /404.html;
    location = /40x.html {
        index 400.html;
    }

    error_page 500 502 503 504 /50x.html;
    location = /50x.html {
 #     index 500.html;
    }
}
}
坑
1. 400 bad request“The plain HTTP request was sent to HTTPS port
因为每一次客户试图通过HTTP访问你的网站,这个请求被重定向到HTTPS。于是Nginx预计使用SSL交互,但原来的请求(通过端口80接收)是普通的HTTP请求,于是会产生错误。
解决办法:
- 1
- 2
- 3
- 4
- 5
- 6
- 7
ssl on; # 注释掉这一行
在nginx.conf的server里使用如下配置
server {
listen 80;
listen 443 ssl;
xxx...
}
这样,Nginx就可以同时处理HTTP请求和HTTPS请求了。
2. 查看左上角安全图标,提示“您与此网站之间建立的连接并非完全安全”。
首先需要确保证书是否正确配置且有效的,如果证书正确配置,那么检查网页内容是否有存在http://的请求,比如文章图片。 也可以打开F12,选中security标签,查看,这里会提示哪个地址不安全导致的
本文章仅为个人工作中记录,如果您觉得本文章有任何不妥的地方请联系我修改,谢谢。


